How To Reset Epson L360 with Adjustment Program
Download Epson L360 adjustment program resetter – Epson L360 resetter to reset Epson L360 printer waste ink counter overflow and reset flashing lights error condition on my Epson L360 printer with Epson adjustment program.
If your Epson L360 printer appears problem message “The Printer’s Ink Pads at the end of Their service life” and Epson L360 printer has red light blinking error: You have to download and reset Epson L360 printer Waste Ink Counter with Epson L360 Resetter
Epson L360 printer Waste Ink Pads Counter overflow error and how to fix that
How you can recognise Epson L360 printer waste counter overflow
Waste Ink Pads are a number of sponge pads inside your Epson L360 printer which is responsible for absorbing, collecting, accommodating unused ink during the printer is working, cleaning the printhead. Once these Waste Ink Pads is overflow, the Epson L360 printer will stop printing immediately.
If your Epson L360 printer has LCD screen, the LCD screen will give an error: “The Printer’s Ink Pads are at the end of Their service life. Please contact Epson Support” or “The Printer’s Ink Pad is at the end of It service life. Please contact Epson Support”.
Your printer’s red light blinking error
Computer show error message “A printer’s ink pad is at the end of its service life. Please contact Epson Support”
Now How To Fix This Problem ??? Solution is Reset the Printer Waste Ink Pad Counter Follow Steps
1. Turn Off the printer before Start Resetting -make sure Epson L360 Printer ( Driver ) Installed in computer(system)
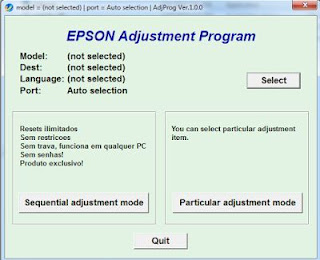
2. Extract And Open Downloaded Epson L360 Resetter Folder - Double Click On "AdjProg.exe" Terms Accept to opened Window "Epson Adjustment Program" select Printer Model And USB Port Then Select "Particular Adjustment Mode" Then Click On "Waste Ink Pad Counter" First "Check" The Main Pad Counter "Initialization" The counter Point 0% shown Now click Finish
Open & Run L360 Epson Adjustment Program "AdjProg.exe" Then Choose "Select"Button
Shown "Particular Adjustment Mode"
Select Model Name And USB Port....Then Click OK
Click On "Particular Adjustment Mode"
Select Click On "Waste Ink Pad Counter"
Check To "Check" The Main Pad Counter Then Click on
"Initialization"
Click Finish
Visit Again For More Solutions Don't Forget To Share & Comment About My Post....
If your Epson L360 printer appears problem message “The Printer’s Ink Pads at the end of Their service life” and Epson L360 printer has red light blinking error: You have to download and reset Epson L360 printer Waste Ink Counter with Epson L360 Resetter
Epson L360 printer Waste Ink Pads Counter overflow error and how to fix that
- Does Epson L360 printer stop to printing and say parts inside your Epson printer are at the end of their life?
- Does it say Epson L360 ink pads need changing?
- Have you got an e-letter in the display and flashing red lights?
- Are you being told to take your Epson L360 printer to an Epson service center?
How you can recognise Epson L360 printer waste counter overflow
Waste Ink Pads are a number of sponge pads inside your Epson L360 printer which is responsible for absorbing, collecting, accommodating unused ink during the printer is working, cleaning the printhead. Once these Waste Ink Pads is overflow, the Epson L360 printer will stop printing immediately.
If your Epson L360 printer has LCD screen, the LCD screen will give an error: “The Printer’s Ink Pads are at the end of Their service life. Please contact Epson Support” or “The Printer’s Ink Pad is at the end of It service life. Please contact Epson Support”.
Your printer’s red light blinking error
Computer show error message “A printer’s ink pad is at the end of its service life. Please contact Epson Support”
Now How To Fix This Problem ??? Solution is Reset the Printer Waste Ink Pad Counter Follow Steps
How to Reset Epson L360 Printer - Follow The Steps To Reset Easily
1. Turn Off the printer before Start Resetting -make sure Epson L360 Printer ( Driver ) Installed in computer(system)
2. Extract And Open Downloaded Epson L360 Resetter Folder - Double Click On "AdjProg.exe" Terms Accept to opened Window "Epson Adjustment Program" select Printer Model And USB Port Then Select "Particular Adjustment Mode" Then Click On "Waste Ink Pad Counter" First "Check" The Main Pad Counter "Initialization" The counter Point 0% shown Now click Finish
Open & Run L360 Epson Adjustment Program "AdjProg.exe" Then Choose "Select"Button
Shown "Particular Adjustment Mode"
Select Model Name And USB Port....Then Click OK
Click On "Particular Adjustment Mode"
Select Click On "Waste Ink Pad Counter"
Check To "Check" The Main Pad Counter Then Click on
"Initialization"
Click Finish
Visit Again For More Solutions Don't Forget To Share & Comment About My Post....


